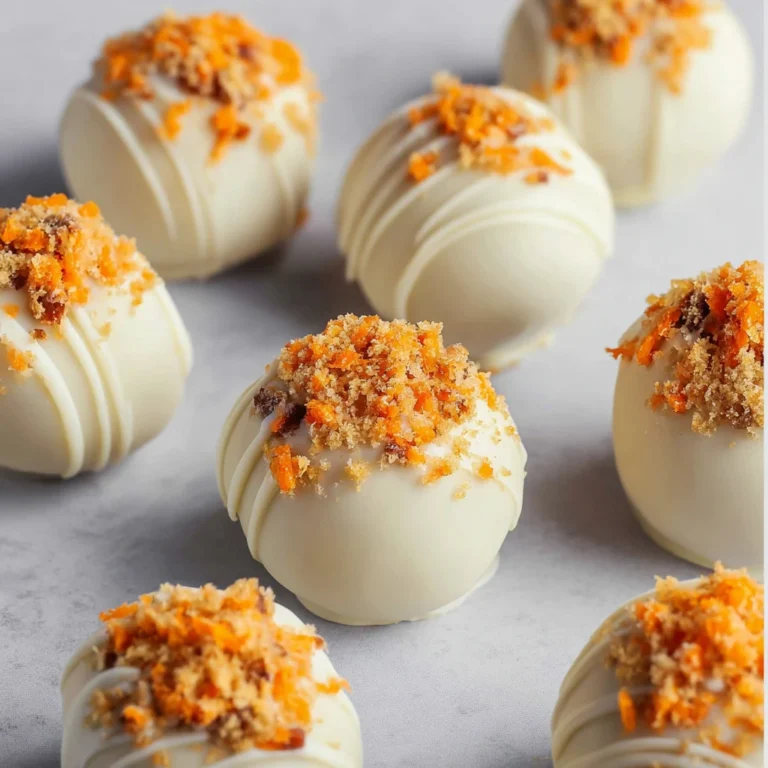
Easter Egg Oreo Balls

Introduction
Imagine a treat that combines the joy of Easter with the deliciousness of Oreo cookies. That’s exactly what Easter Egg Oreo Balls offer—a delightful fusion of festive cheer and sweet indulgence. Whether you’re looking for a fun activity to do with your family or a unique dessert to impress your guests, these Oreo balls are sure to be a hit. In this recipe, we’ll guide you through the process of creating these delectable treats that are not only visually appealing but also irresistibly tasty.
What makes Easter Egg Oreo Balls truly special is the perfect balance of flavors and textures. The crunchy Oreo cookie crumbs on the outside give way to a creamy, rich filling on the inside, making each bite a delightful experience. These treats are not just a feast for the taste buds but also a feast for the eyes, with their colorful and playful Easter egg-inspired appearance.
While these Oreo balls are a modern creation, they carry with them the essence of traditional Easter egg treats, adding a touch of nostalgia to your celebrations. Whether you’re a seasoned baker or a novice in the kitchen, this recipe is designed to be approachable and enjoyable for all skill levels. So, let’s dive in and discover why Easter Egg Oreo Balls are the perfect addition to your Easter festivities.
Get ready to embark on a culinary adventure that combines the magic of Easter with the beloved flavor of Oreo cookies. Let’s gather our ingredients, roll up our sleeves, and create some Easter Egg Oreo Balls that will delight and impress everyone who tries them.
Why You’ll Love This Recipe
One of the key reasons you’ll love this recipe is its simplicity. With just a few ingredients and easy-to-follow steps, you can create a batch of Easter Egg Oreo Balls that look and taste amazing. Whether you’re short on time or new to baking, this recipe is a great starting point for delicious homemade treats.
Additionally, these Oreo balls are versatile and can be customized to suit your preferences. You can experiment with different Oreo flavors, decorations, and fillings to create a variety of Easter Egg Oreo Balls that cater to your unique taste. This recipe allows you to unleash your creativity in the kitchen and produce stunning results with minimal effort.
Furthermore, these Easter Egg Oreo Balls are a crowd-pleaser. Whether you’re serving them at a family gathering, a party, or simply enjoying them at home, these treats are sure to be a hit with kids and adults alike. The combination of familiar Oreo flavors and festive decorations makes them a fun and enjoyable treat for Easter celebrations.
Lastly, these Oreo balls offer a delightful mix of sweetness and richness that makes them a satisfying dessert option. The contrast between the chocolatey Oreo crumbs and the creamy filling creates a harmonious flavor profile that will leave you craving more. With each bite, you’ll experience a burst of flavor that is both comforting and indulgent.
Ingredients
To make a batch of Easter Egg Oreo Balls, you will need the following ingredients:
– Oreo cookies (any flavor of your choice)
– Cream cheese
– White chocolate chips
– Food coloring (assorted colors)
– Sprinkles or decorative sugar
Optional ingredient substitutions:
– You can use chocolate chips instead of white chocolate for a darker coating.
– For a lighter filling, you can use whipped cream or mascarpone cheese instead of cream cheese.
– Feel free to use natural food coloring or skip the coloring altogether for a more subtle look.
– Experiment with different types of sprinkles or coatings to customize the appearance of your Oreo balls.
Step-by-Step Instructions
1. Begin by crushing the Oreo cookies into fine crumbs using a food processor or by placing them in a resealable bag and crushing them with a rolling pin.
2. In a mixing bowl, combine the Oreo crumbs with softened cream cheese until a smooth mixture is formed.
3. Roll the Oreo mixture into small egg-shaped balls and place them on a baking sheet lined with parchment paper.
4. Chill the Oreo balls in the refrigerator for about 30 minutes to firm them up.
5. In the meantime, melt the white chocolate chips in a microwave-safe bowl, stirring at 30-second intervals until smooth.
6. Divide the melted chocolate into separate bowls and tint each bowl with a different food coloring to create vibrant colors for decorating the Oreo balls.
7. Dip each chilled Oreo ball into the colored chocolate, ensuring it is evenly coated, then return it to the baking sheet.
8. Before the chocolate sets, sprinkle the Oreo balls with decorative sugar or sprinkles to add a festive touch.
9. Allow the chocolate coating to set completely before serving the Easter Egg Oreo Balls.
10. Store any leftovers in an airtight container in the refrigerator for up to a week.
Expert Tips for Success
For the best results when making Easter Egg Oreo Balls, consider the following tips:
– Make sure the cream cheese is softened to room temperature to ensure a smooth and creamy filling.
– Use a cookie scoop or your hands to portion out the Oreo mixture evenly for consistent ball sizes.
– Work quickly when dipping the Oreo balls in the colored chocolate to achieve a smooth and even coating.
– If the chocolate starts to thicken while decorating, microwave it for a few seconds to loosen it up again.
– Get creative with your decorations and try different techniques like drizzling, marbling, or using edible glitter for a unique look.
Variations and Substitutions
There are endless possibilities for customizing your Easter Egg Oreo Balls. Here are some ideas for variations and substitutions:
– Experiment with different Oreo cookie flavors, such as mint, peanut butter, or red velvet, to create unique combinations.
– Add crushed nuts, dried fruit, or mini chocolate chips to the Oreo mixture for extra texture and flavor.
– Instead of dipping the Oreo balls in colored chocolate, try drizzling them with multiple chocolate colors for a marbled effect.
– Use candy melts or colored candy coating for a different look and flavor profile.
– Try incorporating flavored extracts like peppermint, almond, or orange to add a hint of extra flavor to the filling.
Serving Suggestions
To serve your Easter Egg Oreo Balls in style, consider the following suggestions:
– Arrange the Oreo balls on a decorative platter or Easter-themed serving dish for a festive presentation.
– Serve the Oreo balls alongside fresh fruit, such as berries or sliced kiwi, to add a refreshing contrast to the rich flavors.
– Pair the Oreo balls with a glass of cold milk, a cup of hot cocoa, or a scoop of vanilla ice cream for a complete indulgent experience.
– Garnish the serving platter with edible flowers, mint leaves, or additional sprinkles to enhance the visual appeal of the dessert.
FAQs
Q: Can I make Easter Egg Oreo Balls ahead of time?
A: Yes, you can prepare the Oreo balls in advance and store them in the refrigerator until you’re ready to serve them. Just make sure to keep them chilled to maintain freshness.
Q: Can I freeze Easter Egg Oreo Balls?
A: While it’s possible to freeze Oreo balls, the texture of the filling may change slightly upon thawing. It’s best to consume them fresh for the optimal experience.
Q: How can I prevent the chocolate coating from cracking?
A: Ensure that the Oreo balls are well-chilled before dipping them in the chocolate, and avoid sudden temperature changes that can cause the chocolate to crack.
Q: Can I use different types of chocolate for coating?
A: Absolutely! Feel free to experiment with milk chocolate, dark chocolate, or even flavored candy melts to customize the flavor of your Oreo balls.
Final Thoughts
As you embark on your Easter baking adventure, consider adding Easter Egg Oreo Balls to your repertoire of festive treats. With their delightful appearance and scrumptious taste, these Oreo balls are a wonderful addition to any Easter celebration. Whether you’re making them for your family, friends, or yourself, the process of creating these treats is as enjoyable as the end result.
Remember to have fun in the kitchen, experiment with different decorations and flavors, and share the joy of Easter with those around you through these delightful Easter Egg Oreo Balls. May your Easter be filled with love, laughter, and lots of delicious treats!
Easter Egg Oreo Balls
Easter Egg Oreo Balls are a delightful fusion of Easter joy and Oreo cookies, offering a balance of crunchy Oreo crumbs and creamy filling in every bite. These visually appealing treats are perfect for impressing guests or enjoying with family during Easter celebrations.
Ingredients
- Oreo cookies
- Cream cheese
- White chocolate chips
- Food coloring
- Sprinkles or decorative sugar
Directions
-
Begin by crushing the Oreo cookies into fine crumbs using a food processor or by placing them in a resealable bag and crushing them with a rolling pin.
-
In a mixing bowl, combine the Oreo crumbs with softened cream cheese until a smooth mixture is formed.
-
Roll the Oreo mixture into small egg-shaped balls and place them on a baking sheet lined with parchment paper.
-
Chill the Oreo balls in the refrigerator for about 30 minutes to firm them up.
-
In the meantime, melt the white chocolate chips in a microwave-safe bowl, stirring at 30-second intervals until smooth.
-
Divide the melted chocolate into separate bowls and tint each bowl with a different food coloring to create vibrant colors for decorating the Oreo balls.
-
Dip each chilled Oreo ball into the colored chocolate, ensuring it is evenly coated, then return it to the baking sheet.
-
Before the chocolate sets, sprinkle the Oreo balls with decorative sugar or sprinkles to add a festive touch.
-
Allow the chocolate coating to set completely before serving the Easter Egg Oreo Balls.
-
Store any leftovers in an airtight container in the refrigerator for up to a week.